
Are you looking to migrate from cPanel to Plesk but need help figuring out where to start? The general idea of transforming web hosting control panels can be quite dubious, but with some help, it can be acceptable. In this comprehensive guide, you will find all the step-by-step instructions you need to transfer from cPanel to Plesk.
Understanding the Basics of cPanel and Plesk
cPanel and Plesk are today’s market’s most popular hosting control panels. They were supposed to ensure that the end-users and system administrators could implement different mechanisms for the website and server accordingly. It is easy to use a fresh-looking management tool known as cPanel. It is trendy among customers mainly due to its simple navigation and numerous features that could meet the needs of web hosting users. PHP provides GUI, which makes accessible works like publishing a website, Domain management, organizing web files, creating and managing email accounts, and controlling databases.
Thus, Plesk has comparable features but stands out for its concentration on the convenient interface for Windows and Linux servers. As such, it is especially appreciated for its flexibility and compatibility with virtually any operating system. Plesk’s design targets both the advanced web developer and the new one, as it has a clean layout that is easy to navigate. Besides, the priority of security is revealed in Plesk, and it offers some unique features that are the WordPress Toolkit, Let’s Encrypt SSL Certificate Manager, and extensions for automatic backup and server management.
These are core elements that any person wanting to migrate to cPanel or Plesk should know. It becomes easier to compare the given platforms, make a rational decision, and choose the most suitable control panel for specific hosting needs and preferences.
Pre-Migration Checklist for a Hassle-Free Transition
Embarking on a cPanel to Plesk migration journey requires careful planning to avoid any roadblocks that might disrupt your web presence. The foundation of a smooth migration process is a comprehensive pre-migration checklist. To begin, it is advised to create an accurate copy of every element within a user’s cPanel environment, which encompasses websites, databases, and emails. This means these backups act as backups and ensure that no original data is eliminated during this switching.
After that, it is recommended that you pay attention to the settings within the domain area. Check that all your domain name system (DNS) settings are well entered and correct. This involves verifying the A records, MX records, and any record that is crucial in delivering your site services and your business emails. As a general rule, DNA misconfiguration is a real problem that is bound to manifest itself sooner rather than later and is doomed to entail unwanted downtimes; that is why this step is required.
Moreover, the current hosting scenario has to be assessed to determine if there may be any special settings or applications that will require some particular attention during the transition process. Take note of PHP versions, cron jobs, and any installed software or scripts. Understanding the specifics of your current setup will help you replicate or adapt these configurations in Plesk, ensuring a seamless transition.
Thus, ensure that the target Plesk environment of your existing configuration meets or exceeds the prerequisites. This means compatibility and enhanced performance during and after migration. The tasks discussed above will prepare you for a seamless migration experience and thus increase the probability of a successful one.
Choosing the Right Migration Method for Your Needs
Selecting the optimal migration method is crucial for a smooth transition from cPanel to Plesk. Your decision relies on several issues concerning the website, data levels, and proficiency level.
That is why one of the tools is the Plesk Migrator, which is aimed at performing site migrations easily. This tool is most useful when the user needs a high level of automation and does not need much of his/her hand in the process. This method is more relevant in handling the transfer of files, databases, and last but not least, users’ email accounts.
Another procedure that can be used is called manual migration, which is beneficial for those people who enjoy performing the operations themselves or they have some specific settings that automated tools cannot provide. It is a method that involves the transfer of files through the FTP while that of databases through phpMyAdmin. However, this approach is more flexible than automated tools since it means that the migration process can be customized by the user. However, it is complex and has an advanced technical nature, and it takes comparatively longer.
Finally, an advantage of using a professional migration service is relevant to the users who would like to work with a specialist and be sure in the result. This is especially useful for large migrations or any user who would want to minimize risk when transferring between host C Panels. They may need professional services to create a custom migration program responding to the organization’s needs and offering the shortest period with minimal critical downtimes.
Your choice should align with your needs, expertise, and the specific intricacies of your hosting environment, ensuring a hassle-free migration to Plesk.
Step-by-Step Guide to Migrating with the Plesk Migrator Tool
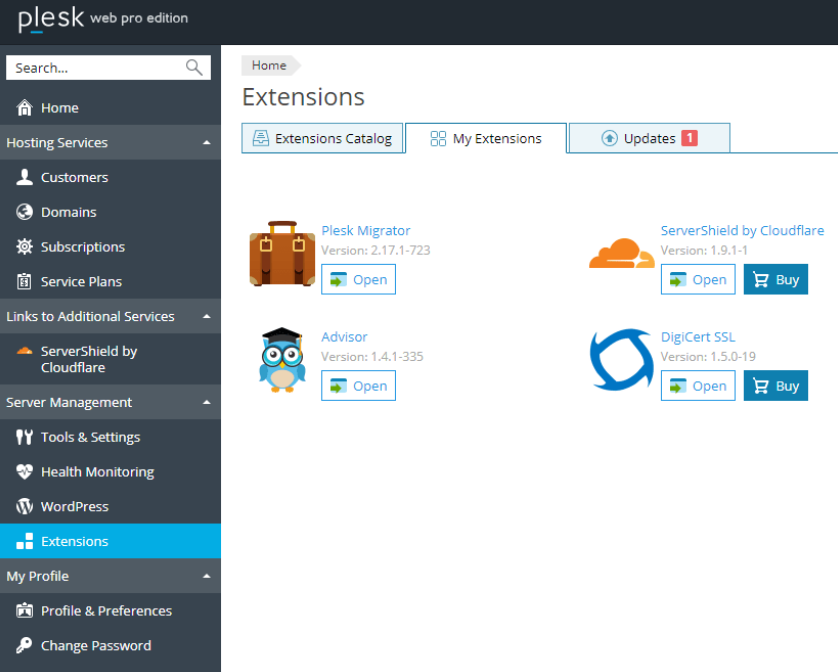
To initiate your migration with the Plesk Migrator tool, first, ensure that Plesk is installed on the destination server. Log into your Plesk panel and navigate to the “Tools & Settings” menu, where you’ll find the “Migration & Transfer Manager.” Here, you’ll kick off the process by specifying the source server’s details, including the IP address and root access credentials of your cPanel account. The tool automatically scans the cPanel account, providing a list of detectable domains, mailboxes, and databases available for migration.
Next, select the content you wish to migrate. Depending on your needs, this can range from entire websites to specific databases or mailboxes. After selection, the migration tool begins transferring the data, maintaining a detailed log of all operations, and allowing you to monitor the progress in real time.
Once the transfer is complete, it’s critical to verify the integrity and functionality of the migrated data. Check that websites are rendering correctly, databases are intact, and email accounts are operational. This step ensures that everything has been transferred successfully and functions as expected in the new Plesk environment.
By following these steps, leveraging the Plesk Migrator tool becomes a streamlined way to transition from cPanel, mitigating much of the manual workload and technical challenges typically associated with such migrations.
Post-Migration Steps to Ensure Your Site’s Optimal Performance
Once the migration to Plesk is complete, you should undertake several critical steps to fine-tune your site’s performance on the new platform:
- Ensure all DNS settings are correctly pointed to your new server to prevent accessibility issues. This step is very crucial to ensure that the website you are carrying for your clients continues to be active on the internet. Subsequently, at least three times, scrutinize your website’s pacing, the functionality of forms, and every minute facets that may require a changing touch.
- Performance monitoring tools available within Plesk should be implemented to monitor the website’s speed and responsiveness. These tools help note any other emerging problems in good time so that appropriate action is taken.
- Fine-tune the general security options available in Plesk for your website.
Leveraging on the securities that come with Plesk means that being attacked, your data and that of your users are safe. By addressing such areas before they turn into problems, you can ensure that your site remains fully operational and, more importantly, fully realize the functionality provided for in the Plesk package.

Common Migration Challenges and How to Overcome Them
Navigating through the migration from cPanel to Plesk, you’re likely to face a few hurdles. One major challenge is ensuring compatibility, as not all applications or plugins in cPanel might work seamlessly in Plesk. To tackle this, thoroughly test all components in a staging environment before going live. This proactive approach allows you to identify and address any compatibility issues early.
Another challenge is the risk of data loss or corruption during the migration process. To mitigate this, perform comprehensive backups and validate the integrity of the data before and after the migration. Employing the Plesk Migrator tool’s verification feature can significantly reduce the risk of data-related issues by ensuring that all files, databases, and emails are correctly transferred and intact.
Downtime is a common concern affecting your website’s accessibility and user experience. Minimize downtime by planning the migration during off-peak hours and ensuring swift DNS propagation. Keeping your cPanel account active until you have confirmed the successful migration and functionality of all services in Plesk can also provide an additional safety net.
In the following pages, you will learn different strategies that help you to address all of the above-mentioned challenges before and, thus, make the migration from cPanel to Plesk less problematic and create a basis for the optimal further development of the web hosting service.
Making the Most of Your New Plesk Environment
Becoming ready to work with a new, joyful Plesk environment gives you several possibilities to improve your website’s administration and protection. We will discuss all of the additional features. The first is the advanced WordPress Toolkit, which helps manage WordPress sites, perform staging and cloning, and check for vulnerabilities.
Take advantage of Plesk’s support for multiple PHP versions, which allows for flexible application hosting and ensures your site runs on the most compatible and secure PHP version. Utilize the scheduled task manager to automate routine maintenance tasks and optimize your site without manual intervention. Discuss fail2ban, firewall tools, and auto-SSL certificate renewal to ensure your site is safe at Plesk. Therefore, by utilizing these capabilities, you can enhance your work in web hosting and strengthen your online site in Plesk efficiency and protection.