Navigating the world of web hosting can be daunting, especially when encountering errors. If you’re managing your website through cPanel, you might have stumbled upon issues related to the PHP Selector. This tool is very valuable for making the suitable choice of the PHP version for the applications but the problem is sometimes it could be challenging. In this guide, however, it will be our aim to go through a detailed step-by-step approach that you can use to troubleshoot PHP Selector errors in cPanel.
Understanding PHP Selector in cPanel
That’s why the PHP selector in cPanel is a valuable tool for webmasters as it allows them to make changes to PHP versions for individual websites. All types of PHP have distinct features, enhancements in security, and improvements in productivity depending on the version to be chosen for their applications.
PHP Selector gives you the flexibility of selecting between versions to keep your site synchronized with the latest trends in various developments yet at the same time takes precautions to keep your site from developing unnecessary instabilities.
In addition to versioning, with PHP Selector you also can manage extensions. The purpose of such extensions is to extend the functionality of the PHP environment and to allow certain features necessary for certain applications and scripts to work. Disabling or enabling an extension depends on a tab that is easily found making sure that the website runs as required.
This versatility is of special utility and interesting for the sites that host several applications that could need different PHP environments. Whatever these requirements are, whether employing certain web content management platforms such as WordPress, and Joomla, among others, or custom scripts, PHP Selector assists here in accomplishing all these needs effectively.
Recognizing how to use it efficiently brings about a considerable improvement in the efficiency and security of your site and in addition inspires a strong base for numerous web projects.
Common PHP Selector Errors
PHP Selector, despite its convenience, can sometimes present challenges that disrupt your website’s functionality. One frequent issue is incompatibility errors, where certain scripts or applications don’t support the selected PHP version, causing them to malfunction. Another common problem is extension errors; these occur when essential PHP extensions are either missing or incompatible with your site’s requirements.
Another cause of PHP Selector problems that can affect your site is configuration mistakes in the settings found on the cPanel. Knowing these common mistakes makes it easier to troubleshoot and ensure that all the mishaps are tackled appropriately.
Checking Current PHP Configuration
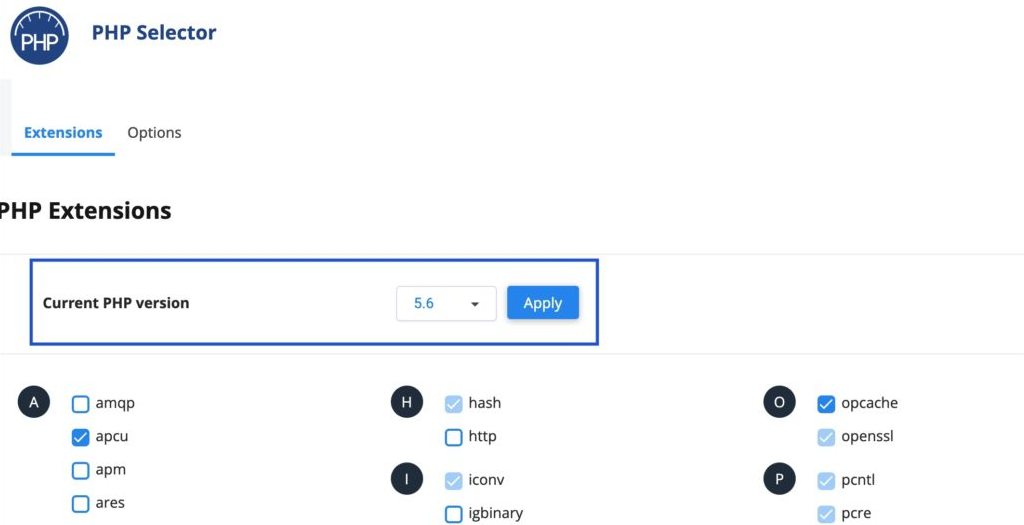
Before diving into troubleshooting, it’s important to verify your current PHP configuration within cPanel. Start by logging into your cPanel account and navigating to the “Software” section. From there, click on “Select PHP Version.” This interface will display the current PHP version your website is using, along with a list of enabled extensions.
Note this information carefully, as it can be invaluable when diagnosing issues or implementing changes. If you suspect certain extensions might be causing problems, make a list of the ones currently enabled. This step helps make sure the bases are covered so you have a clear understanding of what is already set up so that the possibilities for errors are more easily identified.
Updating PHP Versions
Updating your PHP version can address many common issues, especially if your site is running an outdated version. To update your PHP version in cPanel:
- Access the “Select PHP Version” feature under the “Software” section of your cPanel dashboard.
- From the dropdown menu, select the PHP version you want to upgrade to.
- Click “Set as current” to apply the new PHP version to your website.
It’s crucial to ensure your website and applications are compatible with the new PHP version before making the switch. Certain scripts and plugins may not work correctly on newer versions of PHP. Testing the new PHP version in a staging environment before applying changes to your live site can help avoid disruptions.
After updating, you might need to re-enable or adjust PHP extensions to match the requirements of the new version. This step is necessary to ensure that your site does not develop any further issues and to also get to enjoy new updated features, bug fixes, and Security patches if any provided under the update.
If your website uses custom PHP settings, review and adjust your php.ini file to align with the new PHP version’s defaults and capabilities. This ensures that custom configurations are preserved and any new PHP features are properly utilized. If you are having any troubles during this process you should contact your hosting provider or make a question to the professional forums.
Enabling and Disabling PHP Extensions
In the PHP Selector interface within cPanel, you can manage PHP extensions to enhance or troubleshoot your website’s functionality. To get started, navigate to “Select PHP Version” under the “Software” section. Here, you’ll find a list of available extensions for your current PHP version. Each extension will have a checkbox next to it, indicating whether it is enabled or disabled.
If you need to enable an extension, simply check the box next to the desired extension. Conversely, to disable an extension, uncheck the corresponding box. These changes can help address compatibility issues or fulfill specific requirements of your web applications.
For example, if you are using WordPress, you might need extensions like cURL or GD. It is recommended these extension are enabled to avoid related errors and improve functionality of your site. Just as with disabling extensions, it is possible to benefit from deactivating unnecessary ones since they always consume resources.
One might find out that it is worthwhile to find out which extension is relevant to specific applications before changing anything. If you are uncertain about an extension’s purpose or impact, consult the official PHP documentation or seek advice from your hosting provider.
After making adjustments, always test your website thoroughly to ensure everything functions as expected. Keep a list of the changes made, so you can easily revert if any new issues arise. By effectively managing PHP extensions, you can maintain a stable and efficient website environment.
Troubleshooting Configuration Files
Configuration files like php.ini are crucial for fine-tuning PHP settings, and errors here can directly impact the PHP Selector’s performance. Start by navigating to the cPanel File Manager and locating the php.ini file, typically found in the root directory of your server.
This should be done by opening the file containing the configurations in the terminal, a check being made to see whether there is any syntax that is wrong or whether the particular configurations have been structured in the wrong manner.
Take a closer look at settings including memory limits execution times and handling of errors. These parameters can predetermine PHP behavior and, therefore, may require fine-tuning to meet your Web site’s needs. If you spot any misconfigurations, correct them and save the changes.
It’s also useful to compare your php.ini settings with recommended configurations for the PHP version you’re using. If you’re not familiar with the necessary settings, consider using a phpinfo() script to display your current PHP environment settings, providing a reference point for adjustments.
For those uncomfortable with manual edits, some hosting providers offer graphical interfaces for modifying php.ini settings directly within cPanel. Utilizing these tools can reduce the risk of introducing errors.
Always create a backup of your php.ini file before making any changes. This way if we have some issues with configuration we can easily revert to the previous configuration. As with any tool, if you have recurring problems, you may benefit from speaking with an expert and confirming that all your settings are correct and free of errors.
Restoring Default Settings
Restoring default settings can sometimes be the quickest way to resolve ongoing PHP Selector errors. In cPanel, this process is straightforward and can often eliminate issues caused by misconfigurations or incompatible extensions. Navigate to “Select PHP Version” under the “Software” section of your cPanel dashboard. Once there, look for the option labeled “Use Defaults.” Clicking this will revert all PHP settings to their original state.
Keep in mind that reverting to default settings will erase any custom configurations you’ve made, such as specific PHP extensions or custom php.ini settings. Therefore, it’s prudent to back up your current settings before proceeding. Having this backup will allow you to restore your custom configurations if needed, ensuring that you don’t lose any important adjustments that were previously working well.
This reset can be particularly useful if you’ve made multiple changes and are unsure which one might be causing the problem. By starting fresh, you can systematically reapply necessary customizations, testing each step to ensure it doesn’t reintroduce the error. If issues persist even after resetting to defaults, further investigation or professional assistance may be required.
Seeking Further Assistance
If the troubleshooting steps fail to resolve PHP Selector errors, consider reaching out for more specialized help. An initial stop should always be your hosting provider’s support staff – they usually understand the inner workings of various server environments and might have some stronger recommendations.
Additionally, numerous online forums and communities, such as Stack Overflow or the cPanel forums, are filled with knowledgeable users who have likely encountered similar issues. If you join such groups, you will be exposed to another solution or be convinced that it is not just you who is facing the problem and that it might be a major one.
Remember to provide detailed information about your current PHP configuration, error messages, and steps you’ve already taken when seeking help. This will enable others to give more precise and helpful responses.


