Security is one of the leading concerns on the internet today, and so is the need for well-optimized web servers. One widely used method for server optimization and security is a reverse proxy. In this guide, we will explain how to configure an Nginx reverse proxy on your server.
Understanding What a Reverse Proxy Is and Why You Need One
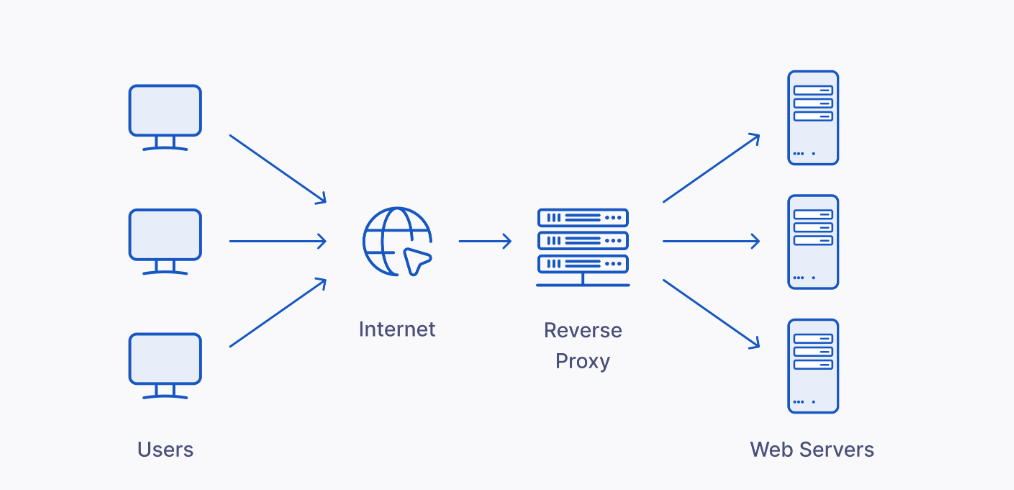
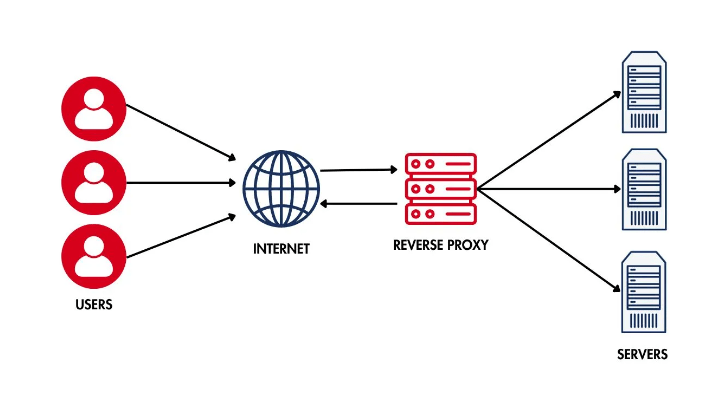
A reverse proxy mediates between the client and one or more backend servers. If a client initiates a request, the reverse proxy captures this request and passes it to the backend server. The benefit of this indirect way of managing requests is the following: First, it hides the details of backend servers from the client, which can significantly improve protection, as directly attacking your server’s IP becomes much more difficult.
Also, a reverse proxy can help spread the load across many servers and avoid having only one overloaded server that slows down the website and, in the worst-case scenario, leads to constant downtime. Also, they can act as cache servers, thus decreasing the load on the backend hosts and increasing the speed of the response to the static content.
This makes them very useful in the balanced control of web traffic and the establishment of a watertight web traffic management system. By looking at their importance in modern web architecture, particularly in security and performance, one is convinced that it is essential to have a reverse proxy incorporated into a server setup.
Installing Nginx on Your Server
The initial step in setting up your Nginx reverse proxy involves installing Nginx on your server. The process varies slightly depending on the operating system you’re using. For most Linux distributions, such as Ubuntu or CentOS, you can employ the package manager for a straightforward installation. For Ubuntu, this involves running commands like `sudo apt update` followed by `sudo apt install nginx`.
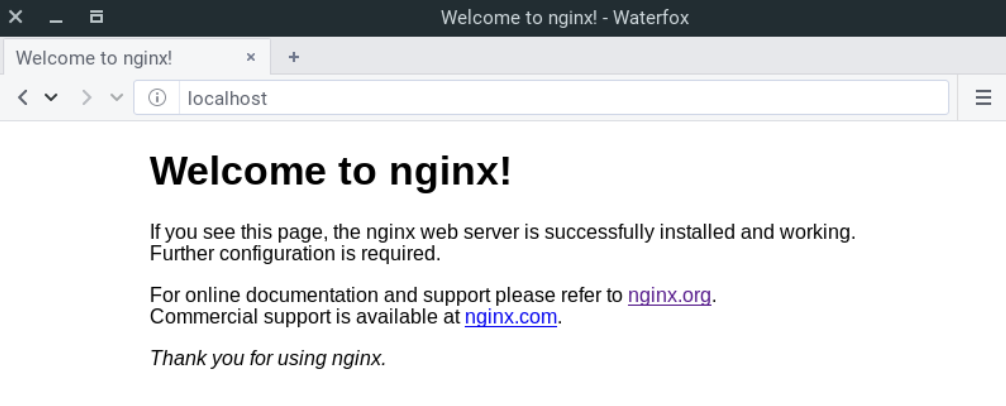
On CentOS, the commands shift to `sudo yum update` and `sudo yum install nginx`. If you’re operating on a Windows server, you’ll need to download the Nginx Windows version from the official Nginx website and follow the installation instructions provided there. After successfully installing Nginx, it’s crucial to verify the installation by accessing your server’s IP address in a web browser; you should see the default Nginx welcome page.
This confirms that Nginx has been installed correctly and is running on your server, laying the groundwork for the next steps in configuring it as a reverse proxy.
Essential Nginx Configuration Files and Directives
Navigating the configuration of Nginx involves understanding its primary configuration files and the directives that dictate its behavior. The central configuration file at `/etc/nginx/nginx.conf` lays the foundation of Nginx’s configuration structure. This file contains global settings that apply to all served domains and applications.
For more granular control over specific sites, Nginx utilizes the `sites-available` directory, where individual configuration files can be created for each domain or application. Each file can include various directives to tailor the server’s response to client requests. Directives such as `listen` and `server_name` specify the port and domain name, while `location` blocks define how different request URIs are handled.
It is essential to know how these files and directives work to set up Nginx to do what you want, whether running a primary web server or a complicated reverse proxy. Understanding those elements allows administrators to achieve maximum possibilities for Nginx usage to increase the website’s performance and protection.

Configuring Nginx as a Reverse Proxy Server
To effectively turn Nginx into a reverse proxy server, start by navigating to the `/etc/nginx/sites-available/` directory and creating a new file for the domain or application you’re aiming to set up the proxy for. Open this file with a text editor and begin the configuration by setting up a server block. This block should include directives such as `listen` to specify the port Nginx will use for the proxy and `server_name` to define the service’s domain name.
Within this server block, you’ll introduce a `location /` block where you’ll configure the actual proxy settings. The critical directive here is `proxy_pass`, which redirects incoming requests to the designated backend server’s URL, including the protocol (HTTP or https) and the server address. Additional proxy-related directives can optimize the connection between the proxy and the backend servers. For example, `proxy_set_header Host $host` ensures the original host header is forwarded to the backend server, which is crucial for applications that generate links or redirect based on this header.
After setting up the necessary directives, save your changes and exit the text editor. To activate the configuration, create a symbolic link in the `/etc/nginx/sites-enabled/` directory to the file you edited in `sites-available`. Finally, test the Nginx configuration for syntax errors by running `nginx -t` and, if successful, apply the changes by restarting Nginx with `sudo systemctl restart nginx`. This completes the setup, and your Nginx server now functions as a reverse proxy, routing client requests to your specified backend server(s).
Testing and Troubleshooting Your Nginx Reverse Proxy Setup
Once your Nginx reverse proxy configuration is in place, validating its functionality is crucial to ensuring it correctly routes requests to your backend servers. Use tools such as `curl` to simulate client requests, or employ your web browser’s developer tools to closely observe the request flow and response times.
Please pay attention to the HTTP status codes in the responses; a successful setup should result in 200 status codes for proxied requests, indicating they’ve been correctly handled and passed through to your backend. If you encounter errors or unexpected status codes, the Nginx error log is invaluable for diagnosing problems.
Located by default at `/var/log/nginx/error.log`, this log file records issues related to request handling, allowing you to pinpoint configuration mistakes or connectivity issues with backend servers. Additionally, ensure that your proxy_pass directives accurately point to the correct backend servers and that your Nginx configuration files have no typos or syntax errors. Properly analyzing these elements can significantly streamline the process of identifying and correcting any issues with your Nginx reverse proxy setup.
Advanced Nginx Reverse Proxy Configurations
Again, what you find buried in the bowels of Nginx are many more features of a functional reverse proxy, making your setup even more optimal in functionality and load distribution. I have already mentioned the enhancement of load balancing as one mechanism that can be implemented. The incoming traffic load can also be divided between several servers at the back end, thus avoiding congestion on a single server. This is achieved by adding the `upstream` directive in your Nginx configuration, where you specify the backend servers’ details.
Moreover, leveraging HTTP/2 with Nginx can significantly improve the speed of content delivery to clients. Enabling HTTP/2 is straightforward and involves adjusting the `listen` directive to include the `http2` parameter. This upgrade from HTTP/1.1 allows for multiple simultaneous requests and responses between the client and server, decreasing page load times and enhancing the user experience.
Another area of focus is on configuring caching strategies for dynamic content. While Nginx excels at serving static content, by employing the `proxy_cache` directive, you can cache responses from the backend servers, reducing the need for repeated processing of similar requests. This setup will demand consideration of the cache keys and duration to achieve fresh content and effectiveness.
Delving into these higher-level options can enhance your Nginx reverse proxy’s utility and make your website structure more complex and service-oriented to clients.
Security Best Practices for Nginx Reverse Proxy Servers
A multifaceted approach is required to bolster the security of your Nginx reverse proxy. First, ensure access control measures that can be achieved by using the `allow` and `deny` directives in Nginx to restrict the access of servers to trusted IP addresses. Another important activity is enabling HTTPS, which is creating SSL/TLS certificates to support the encrypted connection. This helps to secure data in transit between the client and the reverse proxy.
For improved security, it is wise to add a Web Application Firewall (WAF) module to the Nginx, as it acts as a shield that can be used to identify and reject incoming malicious web traffic. Maintaining the update of Nginx is equally crucial; updates help in burning from the most recent security fixations and enhancements, thereby shielding it from various threats and risks.
Last of all, it encourages the use of suitable authentication measures in all the backend services made available through the proxy so that potential attackers are met with a concrete challenge. Therefore, when implemented, the above points help significantly in enhancing the security system of the reverse proxy server from numerous threats and exploits.
Monitoring and Maintaining Your Nginx Reverse Proxy
Effective monitoring and routine maintenance are critical for ensuring the smooth operation of your Nginx reverse proxy. Utilizing tools like Nginx Amplify can give an understanding of the metrics of the site and weaknesses that should be identified and altered before escalating can be identified.
Besides client-polling, Prometheus also offers comprehensive monitoring and allows one to closely monitor the health of the servers as well as the traffic coming in. It is also essential to keep an eye on updates; keeping Nginx up to date means having all the new features and security patches.
In addition, the file and directory to look at occasionally are the log files such as `/var/log/nginx/access. Log.’ log` and `/var/log/nginx/error. Get resolved, and enable one to find solutions to problems with traffic and traffic behavior. An example of such a term is the term ‘log’. Implementing these practices will ensure that the reverse proxy stays at peak performance and efficiency and that your web structure remains as solid and safe as possible.