If you are working with Ubuntu, you may need to remotely manage your server or access files from another machine. Secure Shell (SSH) is a strong network protocol that aims at transferring data between an operating system’s client interface and server. Primarily it is used for remote management, file transfers, and executing commands over an internet connection with high security. In this blog post, am going to guide you on how to install SSH on Ubuntu to enable you to have hassle-free communication for your remote administrative tasks.
Understanding the Basics of SSH and Its Importance
SSH or the Secure shell is one of the most crucial tools in managing network and transferring secure data. It encrypts all data transmitted over a client-server session and protects vulnerable information from threats such as interception and interception attacks. For the system administrators and developers, the SSH offers a secure environment for remote login and therefore allows the users to perform commands and transfer files effectively.
Tools like SCP (Secure Copy Protocol) and SFTP (SSH File Transfer Protocol) leverage SSH to ensure safe data movement. In a time where cyber threats are more prevalent, grasping the significance of SSH is crucial for maintaining your Ubuntu systems’ security and integrity.
Checking for Pre-Installed SSH Components on Ubuntu
Before proceeding with the installation, it’s wise to check if SSH components are already present on your Ubuntu system. Start by opening your terminal and running the following command:
This will show the version of the SSH client if it’s installed. To check for the OpenSSH server, execute:
dpkg -l | grep openssh-server
If you see an entry for the OpenSSH server, it means it’s already installed. Otherwise, you’ll need to proceed with the installation steps detailed in the next section.
Installing OpenSSH Server Using Ubuntu’s Package Manager
To install the OpenSSH server on Ubuntu, you can utilize the APT package manager. Begin by opening your terminal and updating your package list to ensure you’re accessing the latest version:
sudo apt update
Next, proceed with the installation of the OpenSSH server using the following command:
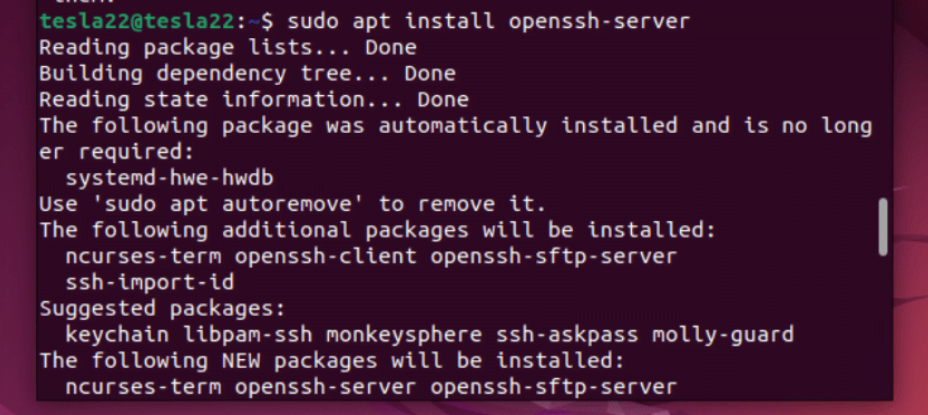
sudo apt install openssh-server
During the installation process, the system will prompt you to confirm the installation. Type ‘Y’ and press Enter to continue. After the installation completes, it is crucial to verify that the SSH server is running correctly. You can check its status by executing:
sudo systemctl status ssh
This command will provide a status overview, indicating whether the SSH service is active and running. If the service is not active, you may need to start it manually or troubleshoot potential issues.
Once installed, the OpenSSH server will allow you to establish secure connections and manage your Ubuntu system remotely. Before you start using it, consider configuring the SSH server settings for enhanced security, as detailed in the following section.

Configuring the SSH Server for Enhanced Security
Securing your SSH server is vital to protecting your system. Begin by editing the SSH configuration file located at `/etc/ssh/sshd_config` using a text editor like nano:
sudo nano /etc/ssh/sshd_config
Here are some key configurations to bolster security:
- **Change the Default Port:** Modify the default port 22 to a different number to reduce exposure to automated attacks. Look for the line `#Port 22` and change it to a new port, such as `Port 2222`.
- **Disable Root Login:** Prevent unauthorized root access by finding the line `PermitRootLogin yes` and changing it to `PermitRootLogin no`.
- **Implement SSH Key Authentication:** Enhance security by setting up SSH key-based authentication instead of relying on passwords. Generate a public and private key pair and configure them appropriately.
- **Restrict User Access:** Limit SSH access to specific users by adding a line like `AllowUsers username1 username2` in the configuration file.
After making these changes, save the file and exit the text editor. Apply the new settings by restarting the SSH service with:
sudo systemctl restart ssh
Enabling and Starting the SSH Service on Ubuntu
After successfully installing the OpenSSH server, the next step is to ensure the SSH service is both enabled and running. This guarantees that the service starts automatically whenever your Ubuntu system boots up.
First, use the following command to enable the SSH service to start at boot:
sudo systemctl enable ssh
Once enabled, you need to start the SSH service. This can be done with the command:
sudo systemctl start ssh
To confirm that the SSH service is running and active, execute:
sudo systemctl status ssh
The output should indicate that the service is active and running. If it’s not, you may need to troubleshoot any potential issues, ensuring that all necessary configurations are correctly set and that no conflicts are preventing the service from starting.
By enabling and starting the SSH service, you ensure a seamless setup that facilitates secure remote access and management of your Ubuntu system.

Testing the SSH Connection to Ensure Proper Setup
To test your SSH setup, open a terminal on a different machine or the same machine to initiate an SSH connection. Use the command:
Replace `username` with your actual username and `your_server_ip` with the IP address of your Ubuntu server. If you have changed the default SSH port from 22 to a different number, include the `-p` option to specify the new port:
ssh -p 2222 username@your_server_ip
When prompted, enter your password or use your SSH key if you’ve configured key-based authentication. If the connection is successful, you will see a welcome message and be granted access to the server’s shell, allowing you to run commands on the remote machine.
If you encounter any issues, verify your server’s IP address and username, check the SSH server’s status with `sudo systemctl status ssh`, and ensure that the correct port is open on any firewalls. This step is essential to confirm that your SSH configuration is correctly set up and that secure remote access is functioning as intended.
Troubleshooting Common SSH Installation Issues
If you encounter issues while trying to connect to your SSH server, here are some common troubleshooting steps you can follow:
- **Check Firewall Settings:** Ensure that your firewall configuration allows traffic on the SSH port. If you’ve kept the default port 22, allow it using:
sudo ufw allow ssh
For a custom port, replace `ssh` with the specific port number, like so:
sudo ufw allow 2222/tcp
- **Verify SSH Service Status:** It’s crucial to confirm that the SSH service is up and running. Use the command `sudo systemctl status ssh` to check its status. If it’s inactive or stopped, start the service with:
sudo systemctl start ssh
- **Network Connectivity:** Ensure that your server is reachable over the network. Use the `ping` command to test connectivity between the client and server. If the server is unreachable, you may need to investigate network issues such as IP address configurations or router settings.
- **Check SSH Configuration File:** Errors or misconfigurations in the SSH configuration file (`/etc/ssh/sshd_config`) can prevent the service from starting properly. Review the file for any syntax errors or incorrect settings. If you make changes, remember to restart the SSH service to apply them:
sudo systemctl restart ssh
- **Review Log Files:** SSH-related errors and warnings are often logged in the system’s authentication log. To gain insights into what might be going wrong, tail the log file with:
sudo tail -f /var/log/auth.log
Look for specific error messages that can guide you toward a solution.
- **Port Conflicts:** If you have other services using the same port as SSH, it could cause conflicts. Make sure no other service is running on your designated SSH port by listing active connections and ports with:
sudo lsof -i -P -n | grep LISTEN
By addressing these potential issues, you can diagnose and resolve common problems that might arise during the setup and usage of your SSH server.
Keeping Your SSH Server Up-to-Date and Secure
Maintaining the security and efficiency of your SSH server is crucial for safeguarding your Ubuntu system. One of the best practices is to regularly update both your Ubuntu system and the OpenSSH server. This ensures you are protected against the latest security vulnerabilities and are running the most optimized version of the software. Execute the following commands to update your system:
sudo apt update
sudo apt upgrade
Besides keeping your system updated, consider implementing additional security measures. Tools like **fail2ban** can be particularly effective in preventing brute-force attacks by blocking IP addresses that exhibit suspicious behavior. To install fail2ban, use:
sudo apt install fail2ban
Another valuable measure is configuring automatic security updates. You can enable automatic updates by editing the configuration file `/etc/apt/apt.conf.d/20auto-upgrades` and adding the following lines:
Periodically reviewing your SSH configuration file (`/etc/ssh/sshd_config`) is also a good practice. Look for any settings that may need tightening, and ensure that your configurations remain aligned with current security standards. For example, disable root login and use key-based authentication instead of passwords to enhance security.
Monitoring your logs for any unusual activity is equally important. SSH-related logs can be found in `/var/log/auth.log`. Regularly check these logs to identify and respond to any potential security incidents promptly.
Adhere to these recommendations and you’ll help maintain the security of your SSH server while maintaining the muscle of your remote management diligently.