In today’s digital world, email security is more important than ever. One way to enhance the security of your emails is by implementing DMARC (Domain-based Message Authentication, Reporting, and Conformance) records. If you are using cPanel to manage your website, configuring DMARC records can help prevent email spoofing and phishing attacks. This quick guide will walk you through setting up DMARC records in cPanel to improve your email security.
Understanding DMARC and Its Importance for Email Security
DMARC can be viewed as essential among all the protocols relevant to email security; it serves as a structural basis for the domain owners to regulate directives regarding how their emails might be authenticated. In its essence, DMARC aims to protect domains from unauthorized activities in email marketing, an imperative activity in light of increasing email threats. It does so by leveraging SPF (Sender Policy Framework) and DKIM (DomainKeys Identified Mail), two established email authentication methods, to validate if an email purportedly sent from a domain indeed aligns with the policies set by the domain’s owner.
This protocol not only denies any try by the vicious parties to disguise as a domain in an email attack but also has a remarkable contribution in maintaining credibility and Confidence in the emails originating from the domain. By specifying a DMARC policy, domain owners can dictate how receivers should treat emails that fail DMARC checks, ranging from letting them through without any action (none) to marking them as spam (quarantine) or outright rejecting them (reject).
One way to effectively protect email security is through implementing DMARC records, especially in today’s world, where phishing and spoofing attacks are very elaborate. This assists in reducing the chances of confidential data being leaked and shielding end-users from scam emails. In addition, DMARC increases the credibility of the emails by verifying the sender’s identity.
Thus, the domain’s general reputation improves, which implies that more genuine messages from the given email domain are likely to be delivered to the target audience rather than treated as spam. Thus, DMARC can be described as a defender of the email’s genuineness and content, which makes it incredibly valuable for any domain that wants to protect its correspondence.
Prerequisites for Setting Up DMARC In cPanel
Before diving into the configuration of DMARC records within your cPanel, you must undertake a few critical preparatory steps to ensure a smooth setup process. First and foremost, having access to your cPanel account is non-negotiable. This access is the gateway to managing various aspects of your website, including the vital DNS settings pertinent to DMARC configuration. Ensure that your login credentials are at hand and you have administrative privileges to change the DNS records.
Additionally, it’s imperative to have a foundational understanding of DNS (Domain Name System) settings. This knowledge is essential as DMARC records are part of your domain’s DNS records, and misconfiguring them can adversely affect your email deliverability and security. Familiarizing yourself with DNS concepts and the cPanel interface will significantly aid in efficiently navigating through the setup process.
Another preparatory measure involves verifying that your domain already has SPF (Sender Policy Framework) and DKIM (DomainKeys Identified Mail) records correctly set up. Since DMARC builds upon these two email authentication protocols by providing instructions on handling emails that fail authentication checks, their prior configuration is crucial. If these records are not in place or are improperly configured, the effectiveness of DMARC in safeguarding your email security will be compromised.
By ensuring that these prerequisites are met, you are laying a solid foundation for successfully implementing DMARC records, thereby enhancing the security and integrity of your email communications through cPanel.
Logging Into cPanel and Navigating to DNS Zone Editor
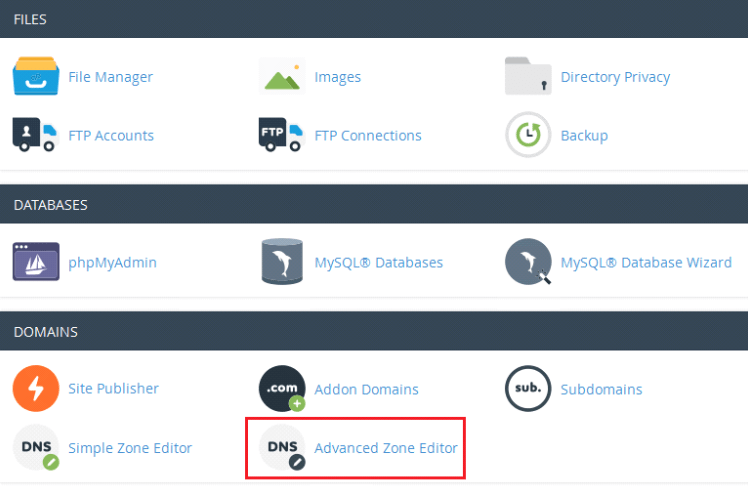
To kick off the DMARC record setup process in cPanel, start by logging into your cPanel dashboard with the username and password you provided. Once logged in, you will be greeted with the cPanel home screen, your command center for managing your website’s backend. From here, the next step is to direct your focus towards the “Domains” area. You might find that cPanel layouts can vary slightly depending on the version or customization by your hosting provider, but generally, the “Domains” section is easily identifiable.
After locating the “Domains” section, your target is the “Zone Editor” option. Clicking “Zone Editor” will transition your screen to a new page dedicated to DNS management. This area is where all the magic happens regarding adjusting, adding, or removing your domain(s) DNS records.
It’s crucial at this juncture to understand the significance of the DNS Zone Editor. This utility is your toolbox for modifying the DNS settings of your domain, a critical step for not just setting up DMARC but for the overall health and routing of your domain’s internet traffic. As you prepare to add DMARC records, familiarizing yourself with the layout and options within the DNS Zone Editor will streamline the subsequent steps, making the process more intuitive and less prone to errors.
Proceeding cautiously and ensuring you’re working on the correct domain (if managing multiple domains) is critical to a successful update. The DNS Zone Editor is powerful, and while it allows for many improvements to a domain’s security and deliverability, it is possible to make mistakes. Hence, it would help if you revisited your choices before proceeding to the next step.
Creating and Adding DMARC Records in cPanel
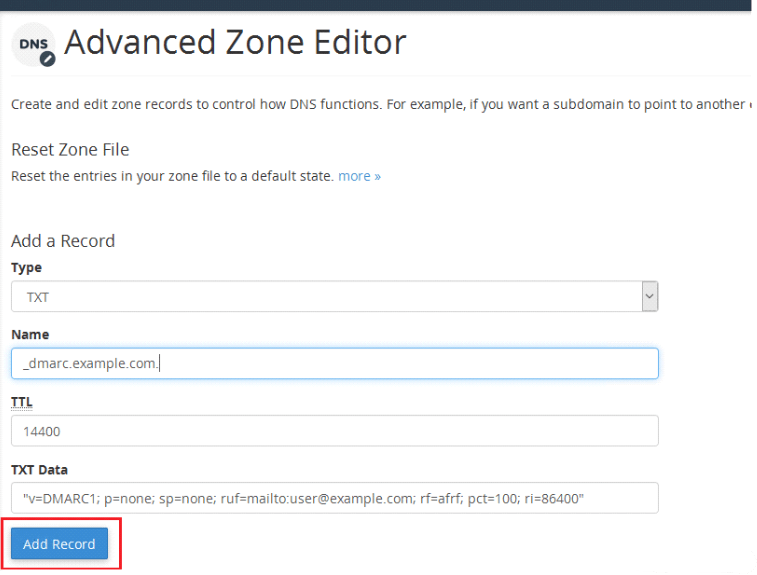
To initiate the creation of DMARC records for your domain in cPanel, navigate to the DNS Zone Editor by selecting “Manage” adjacent to the desired domain name. Upon doing so, you’ll be presented with an option to “Add Record”. It’s here where you select the DMARC record type from the available options. Filling out the DMARC record requires careful consideration of the policy you wish to implement, which can be ‘none’, ‘quarantine’, or ‘reject’. This policy dictates how email receivers handle emails that fail DMARC authentication – a crucial step in protecting your domain from unauthorized use.
For the DMARC record, you must also specify the ‘v=DMARC1’ tag to indicate the version of DMARC being used, along with the ‘p=’ tag for the policy. Additional tags such as ‘rua=’ (reporting URI for aggregate reports) and ‘ruf=’ (reporting URI for forensic reports) can be included to specify where you want reports on your DMARC performance sent. These reports are invaluable for monitoring and adjusting your DMARC policy as needed.
After entering the necessary details into the fields provided, click on the “Add Record” button to finalize the addition of your DMARC record. This action references the DMARC policy in your domain’s DNS records; this improves your email security because it lays the foundation for better or increased authentication of emails from the domain. To stress again, the performance of the DMARC must get these records set up just right in the way to protect your email communication.
Verifying and Testing Your DMARC Configuration
Upon successfully adding your DMARC records through cPanel, it’s essential to carry out verification and testing procedures to ensure everything is configured correctly. Utilizing online tools designed explicitly for DMARC record verification can provide immediate feedback on the accuracy of your setup.
These tools scrutinize your DMARC record for correct syntax and policy alignment, offering a straightforward method to confirm your domain’s DMARC status. Furthermore, conducting email tests sent to various providers is a practical approach to observe firsthand how email services interpret and enforce your DMARC policy.
This step is critical as it can uncover any unforeseen complications or misinterpretations of your DMARC instructions by email receivers, allowing you to make necessary adjustments. Engaging in these testing and verification activities not only confirms the technical correctness of your DMARC setup but also provides peace of mind that your domain’s email communications are safeguarded against unauthorized use and spoofing attempts. You can refine your DMARC policy through diligent testing and verification to achieve optimal email security and deliverability.
Monitoring and Interpreting DMARC Reports
After integrating DMARC records into your domain’s DNS settings through cPanel, the next vital step involves the continuous monitoring and interpretation of DMARC reports. These reports are critical for in orientation of your email environment since they reveal how your outbound communications are authenticated and identify potential points of security compromise.
DMARC reports are typically sent in XML format and detail the success or failure of email authentications, identifying sources of emails (both legitimate and unauthorized) and providing actionable insights into any DMARC policy breaches.
Examining these reports, one can focus on what needs to be adjusted in terms of email security, such as, for instance, outside the organization attempting to send emails on your domain’s behalf or, on the contrary, internal sources that should adjust the email sending frequency and patterns to conform to your DMARC policy.
Besides that, it aligns with the enhancement of security against impersonation and phishing attacks and can contribute to the enhancement of the delivery of the mail in the process of which this analysis checks whether the mail in the middle of the transfer conforms to the set requirements for mail authentication.
For the domain owners, the value of such reports is not only compliance but also the ability to have a transparent and proactive way to monitor emails, enhance sender reputation, and ensure that ‘good’ messages make it through to their intended recipients and are not being caught in spam filters.
Engaging with DMARC reports is not a set-and-forget task; it demands regular attention and interpretation to adapt to evolving email threats and authentication standards, thus maintaining the integrity and reliability of your email communications.


